Connecting to a MySQL Database
| This tutorial needs a review. You can edit it in GitHub following these contribution guidelines. |
This document demonstrates how to set up a connection to a MySQL database from the NetBeans IDE. Once connected, you can begin working with MySQL in the IDE’s Database Explorer by creating new databases and tables, populating tables with data, and running SQL queries on database structures and content. This tutorial is designed for beginners with a basic understanding of database management, who want to apply their knowledge to working with MySQL in NetBeans IDE.
MySQL is a popular Open Source relational database management system (RDBMS) commonly used in web applications due to its speed, flexibility and reliability. MySQL employs SQL, or Structured Query Language, for accessing and processing data contained in databases.
| This tutorial assumes that you already have the MySQL RDBMS installed and configured on your computer. If you are installing for the first time, please refer to the official MySQL documentation for help. You can also refer to Setting Up the MySQL Database Server in the Windows Operating System. |
Configuring MySQL Server Properties
NetBeans IDE comes bundled with support for the MySQL RDBMS. Before you can access the MySQL Database Server in NetBeans IDE, you must configure the MySQL Server properties.
-
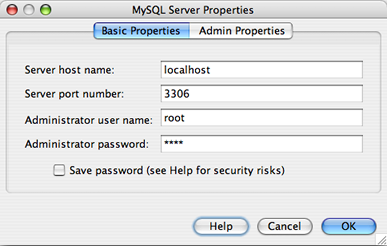
Right-click the Databases node in the Services window and choose Register MySQL Server to open the MySQL Server Properties dialog box.
-
Confirm that the server host name and port are correct.
Notice that the IDE enters localhost as the default server host name and 3306 as the default server port number.
-
Enter the Administrator user name (if not displayed).
| You need administrative access to be able to create and remove databases. |
-
Enter the Administrator password. The default is set to blank.
| A blank password can also be a password. |
-
Click the Admin Properties tab at the top of the dialog box.
The Admin Properties tab is then displayed, allowing you to enter information for controlling the MySQL Server.
-
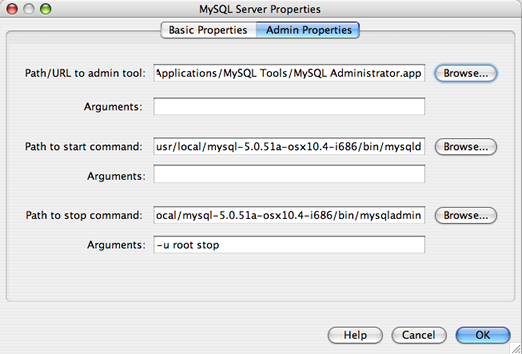
In the Path/URL to admin tool field, type or browse to the location of your MySQL Administration application such as the MySQL Admin Tool, PhpMyAdmin, or other web-based administration tools.
mysqladmin is the MySQL admin tool found in the bin folder of the MySQL installation directory. It is a command-line tool and not ideal for use with the IDE.
|
Type any arguments for the admin tool in the Arguments field.
-
In the Path to start command, type or browse to the location of the MySQL start command. To find the start command, look for
mysqldin thebinfolder of the MySQL installation directory.
The recommended binary for Unix and NetWare is mysql_safe. The start command may also vary if MySQL was installed as part of an AMP installation.
|
Type any arguments for the start command in the Arguments field.
-
In the Path to stop command field, type or browse to the location of the MySQL stop command. This is usually the path to
mysqladminin thebinfolder of the MySQL installation directory. If the command ismysqladmin, in the Arguments field, type-u root stopto grantrootpermissions for stopping the server. -
When finished, the Admin Properties tab should resemble the following figure. If you are satified with your configuration, click OK.
Starting the MySQL Server
Before you can connect to a MySQL Database Server, you must first ensure that the MySQL Database Server is running on your machine. If the database server is not connected you will see (disconnected) next to the user name in the MySQL Server node in the Service window and you will not be able to expand the node.
To connect to the database server, confirm that the MySQL Database Server is running on your machine, right-click the Databases > MySQL Server node in the Services window and choose Connect. You might be prompted to supply a password to connect to the server.
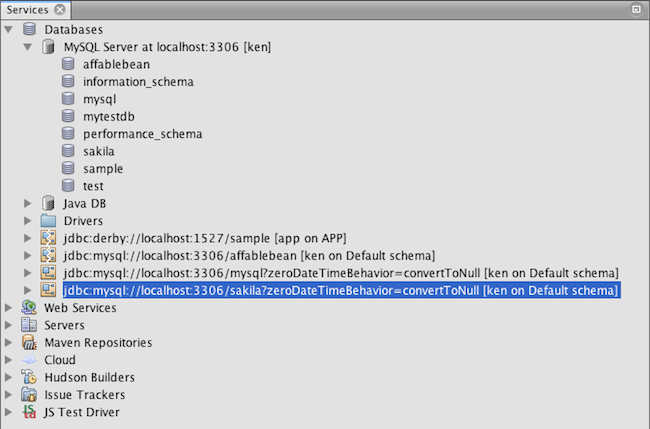
When the server is connected you will be able to expand the MySQL Server node and view the all available MySQL databases.
Creating and Connecting to the Database Instance
A common way of interacting with databases is through an SQL editor. NetBeans IDE has a built-in SQL Editor for this purpose. The SQL Editor is generally accessible via the Execute Command option from the right-click menu of the connection node (or of the connection node’s child nodes). Now that you are connected to the MySQL server, you can create a new database instance using the SQL Editor. For purposes of this tutorial, create an instance called MyNewDatabase :
-
In the IDE’s Services window, right-click the MySQL Server node and choose Create Database.
The Create MySQL Database dialog box opens.
-
In the Create MySQL Database dialog box, type the name of the new database. We will use
MyNewDatabasefor this tutorial. Leave the checkbox unselected at this time.
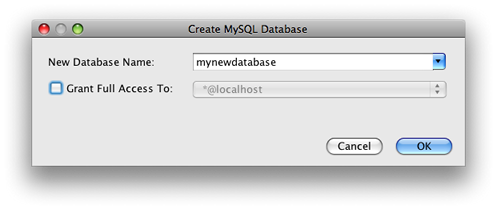
| You can also grant full access to a given user. By default, only the admin user has the permissions to perform certain commands. The drop down list lets you assign these permissions to a specified user. |
-
Click OK.
The new database appears under the MySQL Server node in the Services window.
-
Right-click the new database node and choose Connect in the popup menu to open the connection to the database.
Database connections that are open are represented by a complete connection node (![]() ) in the Services window.
) in the Services window.
Creating Database Tables
Now that you have connected to MyNewDatabase , you can begin exploring how to create tables, populate them with data, and modify data maintained in tables. This allows you to take a closer look at the functionality offered by the Database Explorer, as well as NetBeans IDE’s support for SQL files.
``MyNewDatabase`` is currently empty. In the IDE it is possible to add a database table by either using the Create Table dialog, or by inputting an SQL query and running it directly from the SQL Editor. In the following exercises you will use the SQL editor to create the `Counselor` table and the Create Table dialog box to create the `Subject` table. After you create the tables you will run an SQL script to populate the tables.
Using the SQL Editor
In this exercise you will use the SQL editor to create the Counselor table.
-
In the Database Explorer, expand the
MyNewDatabaseconnection node ( ) and note that there are three subfolders: Tables, Views and Procedures.
 -
Right-click the Tables folder and choose Execute Command. A blank canvas opens in the SQL Editor in the main window.
-
In the SQL Editor, type in the following query. This is a table definition for the
Counselortable you are about to create.
CREATE TABLE Counselor (
    id SMALLINT UNSIGNED NOT NULL AUTO_INCREMENT,
    firstName VARCHAR (50),
    nickName VARCHAR (50),
    lastName VARCHAR (50),
    telephone VARCHAR (25),
    email VARCHAR (50),
    memberSince DATE DEFAULT '0000-00-00',
    PRIMARY KEY (id)
);| Queries formed in the SQL Editor are parsed in Structured Query Language (SQL). SQL adheres to strict syntax rules which you should be familiar with when working in the IDE’s Editor. Upon running a query, feedback from the SQL engine is generated in the Output window indicating whether execution was successful or not. |
-
To execute the query, either click the Run SQL (
 ) button in the task bar at the top (Ctrl-Shift-E), or right-click within the SQL Editor and choose Run Statement. The IDE generates the
 Counselortable in the database, and you receive a message similar to the following in the Output window.
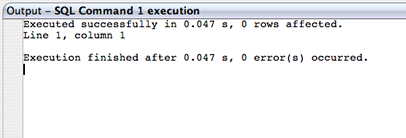
-
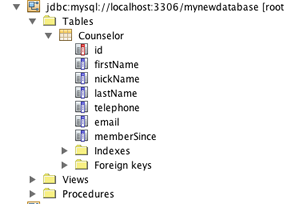
To verify changes, right-click the Tables node in the Database Explorer and choose Refresh. The Refresh option updates the Database Explorer’s UI component to the current status of the specified database. Note that the new
Counselortable node ( ) now displays under Tables in the Database explorer. If you expand the table node you can see the columns (fields) you created, starting with the primary key (
 ).
).
Using the Create Table Dialog
In this exercise you will use the Create Table dialog box to create the Subject table.
-
In the Database Explorer, right-click the Tables node and choose Create Table. The Create Table dialog opens.
-
In the Table name text field, type
Subject. -
Click Add Column.
-
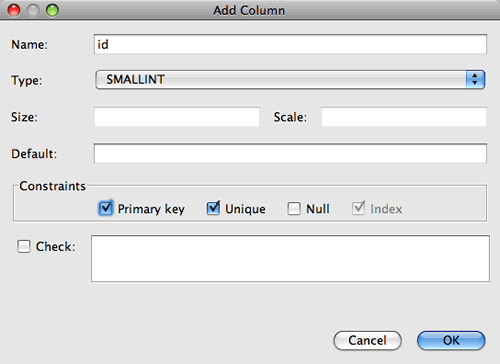
For the Name of the column, enter
id. ChooseSMALLINTfor data type from the Type drop-down list. Click OK.
-
Select the Primary Key check box in the Add Column dialog box. You are specifying the primary key for your table. All tables found in relational databases must contain a primary key. Note that when you select the Key check box, the Index and Unique check boxes are also automatically selected and the Null check box is deselected. This is because primary keys are used to identify a unique row in the database, and by default form the table index. Because all rows need to be identified, primary keys cannot contain a Null value.
-
Repeat this procedure by adding the remaining columns, as shown in the following table.
| Key | Index | Null | Unique | Column Name | Data Type | Size |
|---|---|---|---|---|---|---|
[checked] |
[checked] |
[checked] |
id |
SMALLINT |
0 |
|
[checked] |
name |
VARCHAR |
50 |
|||
[checked] |
description |
VARCHAR |
500 |
|||
[checked] |
FK_counselorID |
SMALLINT |
0 |
You are creating a table named Subject that will hold data for each of the following records.
-
Name: name of the subject
-
Description: description of the subject
-
Counselor ID: counselor ID that corresponds to an ID from the Counselor table
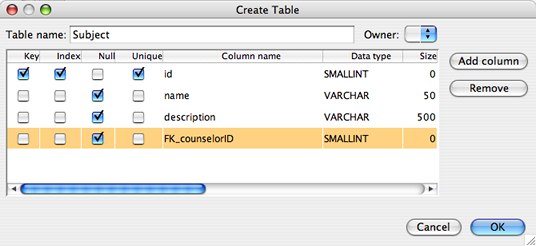
Make sure that the fields in your Create Table dialog match those shown above, then click OK. The IDE generates the Subject table in the database, and you can see a new Subject table node ( ) immediately display under Tables in the Database Explorer.
Working with Table Data
In order to work with table data, you can make use of the SQL Editor in NetBeans IDE. By running SQL queries on a database, you can add, modify and delete data maintained in database structures. To add a new record (row) to the Counselor table, do the following:
-
Choose Execute Command from the Tables folder in the Database Explorer. A blank canvas opens in the SQL Editor in the main window.
-
In the SQL Editor, type in the following query.
INSERT INTO Counselor
VALUES (1, 'Ricky', '"The Dragon"', 'Steamboat','334 612-5678', 'r_steamboat@ifpwafcad.com', '1996-01-01')-
To execute the query, right-click within the SQL Editor and choose Run Statement. In the Output window, you can see a message indicating that the query was successfully executed.
-
To verify that the new record has been added to the
Counselortable, in the Database Explorer, right-click theCounselortable node and choose View Data. A new SQL Editor pane opens in the main window. When you choose View Data, a query to select all the data from the table is automatically generated in the upper region of the SQL Editor. The results of the statement are displayed in a table view in the lower region. In this example, theCounselortable displays. Note that a new row has been added with the data you just supplied from the SQL query.

Running an SQL Script
Another way to manage table data in NetBeans IDE is by running an external SQL script directly in the IDE. If you have created an SQL script elsewhere, you can simply open it in NetBeans IDE and run it in the SQL Editor.
For demonstrative purposes, download ifpwafcad.sql and save it to a location on your computer. This script creates two tables similar to what you just created above ( Counselor and Subject ), and immediately populates them with data.
Because the script overwrites these tables if they already exist, delete the Counselor and Subject tables now so it becomes obvious that new tables are being created when the script is run. To delete tables:
-
Right-click the
CounselorandSubjecttable nodes in the Database Explorer and choose Delete. -
Click Yes in the Confirm Object Deletion dialog box. Note that the dialog box lists the tables that will be deleted.
When you click Yes in the Confirm Object Deletion dialog box, the table nodes are automatically removed from the Database Explorer.
To run the SQL script on MyNewDatabase :
-
Choose File > Open File from the IDE’s main menu. In the file browser navigate to the location where you previously saved
ifpwafcad.sqland click Open. The script automatically opens in the SQL Editor. -
Make sure your connection to
MyNewDatabaseis selected from the Connection drop-down box in the toolbar at the top of the Editor.

-
Click the Run SQL (
 ) button in the SQL Editor’s task bar. The script is executed against the selected database, and any feedback is generated in the Output window.
 -
To verify changes, right-click the
MyNewDatabaseconnection node in the Runtime window and choose Refresh. The Refresh option updates the Database Explorer’s UI component to the current status of the specified database. Note that the two new tables from the SQL script now display as a table nodes underMyNewDatabasein the Database Explorer. -
Choose View Data from the right-click menu of a selected table node to see the data contained in the new tables. In this manner, you can compare the tabular data with the data contained in the SQL script to see that they match.
Conclusion
This concludes the Connecting to a MySQL Database tutorial. This document demonstrated how to configure MySQL on your computer and set up a connection to the database server from NetBeans IDE. It also described how to work with MySQL in the IDE’s Database Explorer by creating new database instances and tables, populating tables with data, and running SQL queries.
 Apache NetBeans
