 Apache NetBeans
Setting Up an Oracle JET Application
| This tutorial needs a review. You can edit it in GitHub following these contribution guidelines. |
This document provides a step-by-step set of instructions guiding you through the process of setting up an application based on Oracle JavaScript Extension Toolkit (JET). JET empowers web and mobile developers by providing a modular toolkit based on modern JavaScript, CSS3, and HTML5 design and development principles.
Setting Up
In this exercise you learn how to set up an Oracle JET application via the ojet-cli tool.
Note: If you have been using the Yeoman-based generator, that is, generator-oraclejet , you must install it before continuing with the steps below, via npm -g uninstall generator-oraclejet .
-
On the command prompt in a terminal window, type the following:
node -vIf the terminal window shows that Node is not installed or at a lower version than 5, go to the Node site and install the Long Term Support (LTS) release of Node. Currently, at the time of writing, the LTS release is v6.11.2, and is listed as being "recommended for most users".
Note: Do not use the Latest release of Node, i.e., v8.x. The Node Package Manager (NPM) version 5 that comes with Node v8.x has bugs that cause nested dev-dependencies to not be installed properly. This is listed in our Release Notes for JET 3.2.0 and we are watching the npm bugs to see when they are going to fix them.
-
After completing the above step, install the Oracle JET Command Line (
ojet-cli) tool as follows:
npm -g install ojet-cliNote: You may need to be in admin mode, such as via sudo -s on Mac OS X, to be able to call the above command.
Under the covers, the ojet-cli tool installs and uses popular JavaScript tools, such as Yeoman and Grunt, as can be seen here. Where previously, you’d have to use commands such as yo and grunt , these are now hidden within the ojet-cli tool and do not need to be installed separately anymore.
-
The
-gargument in the previous step should have installed theojetcommand globally, so that you should be able to runojetanywhere, i.e., not in any specific folder or location since theojetcommand should now be globally available. To try it out, run the following:
ojet helpThe terminal window should now show all the commands available to be used with ojet . If not, you can manually configure the PATH of your system to include ojet-cli .
-
Once you have successfully run
ojet help, useojetto create a new Oracle JET application, as follows:
ojet create MyApp --template=navdrawer'navdrawer', in the command line above, is one of the starter templates made available by Oracle JET, as outlined below:
After the process completes, you should have an application structured as follows:
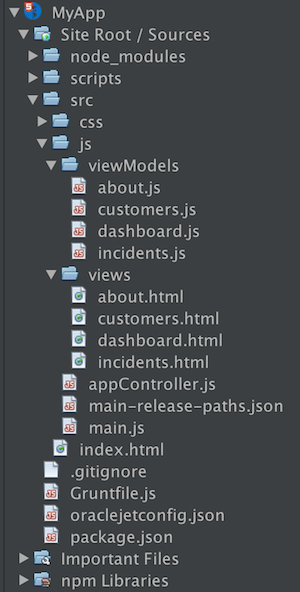
Open the application into an editor or IDE of your choice, such as NetBeans IDE, which displays the application as shown in the screenshot above.
-
Once the application is created, use the terminal window to navigate into the root folder, i.e., the top folder, which is named
MyApp, and build and serve the application, as follows:
ojet serveAfter the build completes, the browser opens and displays the application:

Congratulations, you have successfully set up an Oracle JET application. Repeat the steps above whenever you need to set up a new Oracle JET application.
See Also
For more information about support for Oracle JET and a variety of HTML5 applications in the IDE on netbeans.org, see the following resources:
-
"Learn" section on the Oracle JET site. A set of official Oracle JET learning resources.
-
Working with CSS Style Sheets in HTML5 Applications. A document that continues with the application that you created in this tutorial that demonstrates how to use some of the CSS wizards and windows in the IDE and how to use the Inspect mode in the Chrome browser to visually locate elements in your project sources.
-
Debugging and Testing JavaScript in HTML5 Applications. A document that demonstrates how the IDE provides tools that can help you debug and test JavaScript files in the IDE.
