 Apache NetBeans
Interacting with RESTful Web Services in Oracle JET
| This tutorial needs a review. You can edit it in GitHub following these contribution guidelines. |
This document provides a step-by-step set of instructions guiding you through the process of getting started with RESTful Web Services with the Oracle JavaScript Extension Toolkit (JET). JET empowers web and mobile developers by providing a modular toolkit based on modern JavaScript, CSS3, and HTML5 design and development principles.
Setting Up an Oracle JET Application
In this exercise you set up an Oracle JET application and explore its default content.
-
Follow the steps described in Setting Up an Oracle JET Application.
-
Open the project into an editor or IDE of your choice, such as NetBeans IDE, which displays the application as follows:
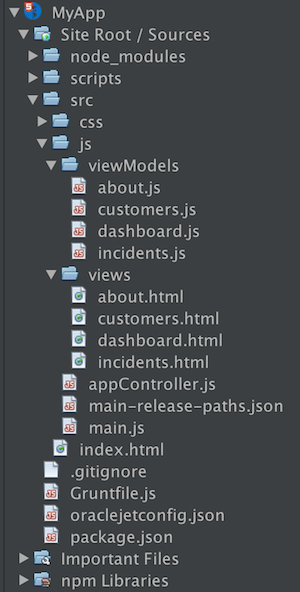
Spend some time browsing through the application structure. In the next section, you’ll be introduced to the main concepts of the application structure.
Scenario 1: Standard jQuery
In this exercise, you use the standard $.getJSON construction from jQuery to access data via a publicly available RESTful web service.
-
In your Oracle JET module’s JavaScript file, add the following:
self.data = ko.observableArray();
$.getJSON("http://movieapp-sitepointdemos.rhcloud.com/api/movies").
        then(function (movies) {
            $.each(movies, function () {
                self.data.push({
                    title: this.title,
                    director: this.director,
                    releaseYear: this.releaseYear,
                    genre: this.genre
                });
            });
        });
self.dataSource = new oj.ArrayTableDataSource(
        self.data,
        {idAttribute: 'title'}
);
Read about ArrayTableDataSource here.
-
In the
defineblock, add a reference toojs/ojtable.
-
In the matching HTML file, add the following:
<table data-bind="ojComponent: {component: 'ojTable',
data: dataSource,
columns: [
{headerText: 'Director', field: 'director'},
{headerText: 'Title', field: 'title'},
{headerText: 'Genre', field: 'genre'},
{headerText: 'Year', field: 'releaseYear'}
]
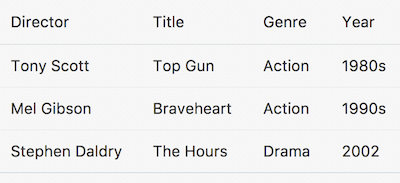
}">
</table>You should now see a table with data in your application:
Scenario 2: Oracle JET Common Model
In this exercise, you learn about the structure of Oracle JET Common Model.
-
The JET Common Model’s oj.Model and oj.Collection allow applications to perform CRUD operations (create, read, update, delete) via REST services. Before going further, read about the Oracle JET Common Model here. Also read Create a Web App with Oracle JET.
-
In the
jsfolder, that is, in the folder wheremain.jsis found, create a file namedMovieFactory.jsand add the following to it:
define(['ojs/ojcore'], function (oj) {
    var MovieFactory = {
        resourceUrl: 'http://movieapp-sitepointdemos.rhcloud.com/api/movies',
        // Create a single movie instance:
        createMovieModel: function () {
            var Movie = oj.Model.extend({
                urlRoot: this.resourceUrl,
                idAttribute: "_id"
            });
            return new Movie();
        },
        // Create a movie collection:
        createMovieCollection: function () {
            var Movies = oj.Collection.extend({
                url: this.resourceUrl,
                model: this.createMovieModel()
            });
            return new Movies();
        }
    };
    return MovieFactory;
});
To understand the idea behind the code above, think of it is an implementation of Martin Fowler's "Active Record" pattern, while its syntax is that of Backbone.Model and Backbone.Collection in Backbone.js. For background reading on the Oracle JET Common Model, see the Oracle JET Cookbook section on Common Model and the Using the Oracle JET Common Model and Collection Framework section in the Oracle JET Developer Guide. Best of all, take a look at the JsDoc for oj.Model and oj.Collection.
-
Replace the complete content of the JavaScript file in your Oracle JET module with the following:
define(['ojs/ojcore', 'knockout', 'MovieFactory',
    'ojs/ojmodel', 'ojs/ojtable', 'ojs/ojcollectiontabledatasource'],
function (oj, ko, MovieFactory) {
    var viewModel = {
        movieCollection: MovieFactory.createMovieCollection(),
        dataSource: ko.observable(),
        // Called each time the view is shown to the user:
        initialize: function () {
            this.dataSource(new oj.CollectionTableDataSource(this.movieCollection));
            this.movieCollection.fetch();
        }
    };
    return viewModel;
});
. The HTML side of your Oracle JET module does not need to change. It is exactly the same as in the previous section.
You should now see a table with data in your application.
Congratulations! You have now learned how to get started with REST in your Oracle JET applications.
See Also
For more information about support for Oracle JET and a variety of HTML5 applications in the IDE on netbeans.org, see the following resources:
-
"Learn" section on the Oracle JET site. A set of official Oracle JET learning resources.
-
Working with CSS Style Sheets in HTML5 Applications. A document that continues with the application that you created in this tutorial that demonstrates how to use some of the CSS wizards and windows in the IDE and how to use the Inspect mode in the Chrome browser to visually locate elements in your project sources.
-
Debugging and Testing JavaScript in HTML5 Applications. A document that demonstrates how the IDE provides tools that can help you debug and test JavaScript files in the IDE.
